The
following modifications were produced in order to improve what the author
feels are several shortcomings in the SP-600 receiver.
My goal was to minimize the impact of the changes to the SP-600 to the
point where they could be easily reversible if some future custodian of the
receiver wanted to do so.
The
areas where I feel the SP-600 needs help are the following:
- The
RF signal level meter is very non-linear and is not calibrated with
S-units. It is useful only as
a tuning indicator.
- The
AGC employs a large amount of delay, which is partially responsible for
the non-linearity of the S-meter.
- SSB
detection with the existing circuitry is very poor, and the existing AGC
is not suited for SSB reception.
In
making the following modifications, I removed as little as possible from the
SP-600 and left all original wiring in place.
New wiring was done with a single color of easily recognizable modern
wire for ease of identification by any future restorer.
These
modifications are for an SP-600 JX1, so there may be minor circuit differences
if you are working with a later model receiver.
Since this will not be a “cookbook” set of instructions, you will
have to know enough about your particular model to make your own decisions
about the best way to incorporate each particular change.
I.
The AGC modifications. It
is best to start with the AGC modifications, because both the S-meter and
product detector changes depend on them.
There are three problem areas I wanted to address with the AGC changes.
First, the bias applied to pin 5 of V14, the AGC detector, causes the
receiver to remain at maximum sensitivity until quite strong signals are
received. At that point the
developed AGC voltage finally overcomes the bias and is fed back to reduce the
gain of the appropriate stages. In
my receiver, dropping the value of R66 in the AGC delay divider below a value
of 4.7k caused some distortion to AM broadcast stations.
So I settled on changing R66 to 4.7k, which reduces the amount of
delayed AGC significantly.
A
second problem with the AGC is that the existing filtering is insufficient to
remove some of the variations due to audio modulation on the incoming carrier.
This is easily corrected by adding a .002 ufd capacitor in parallel
with C140. Note that instead of
replacing C140 with a .003, I have left the original in place to make
restoration easier.
Finally,
some further reconfiguration of the AGC circuit is required to smooth a few
further kinks in the AGC action. The
final circuit is shown below. Wherever
component parts list numbers are used, the original part is unchanged.
Wherever part values are given, it is for a newly added part.
If both are given, it means an existing part has been changed in value.
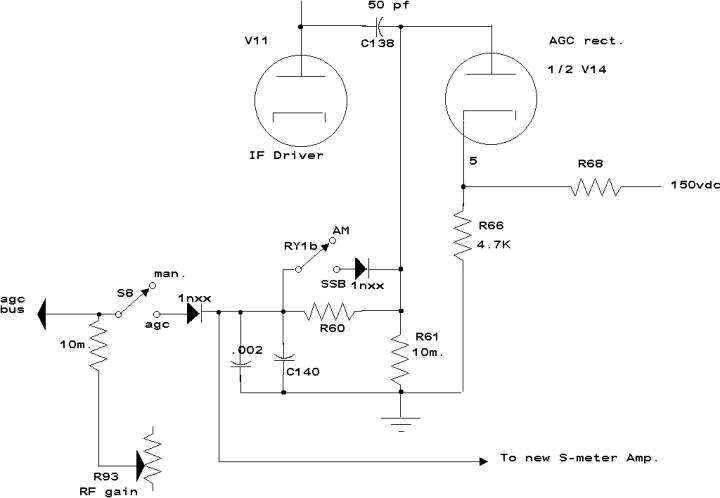
The
10 megohm resistors were added to provide for a slow discharge time constant
which will be more effective on SSB reception.
The 1nxx diode on the left ensures that when the RF gain control is
reduced, thereby pulling the AGC line strongly negative, the new S-meter will
not be pulled upscale. Instead,
it will fall toward zero as the output of the AGC detector drops.
Note
that R97 (3.3meg) is removed and S8, the AGC/Manual switch, has been rewired.
The other half of S8 going to the old RF/AF meter switch is no longer
used, so the wires can be disconnected and taped.
Also, note that C139 is changed in value from 7 to 50 pf.
This provides a stronger drive for the fast-attack AGC mod that will be
added with the product detector. The
rightmost 1nxx diode and relay contacts are not to be added until the product
detector is installed. They are
shown here only for clarity as to where in the circuit they are installed.
All
the semiconductor diodes added for this project are garden-variety types, so I
have used the 1nxx designator. Use
whatever you have.
II.
The S-meter. The
only hard part of the S-meter modification is making a new meter scale for the
existing meter. I’ll describe
the steps I took, and let you decide how best to proceed depending on your
circumstances. First I removed
the S-Meter dial face from my HQ-170 receiver and used a flatbed scanner to
scan into my computer. There I
cleaned up the image and prepared it to be printed out.
I used my printer’s scaling options to get the printed dial scale to
approximate size. At this point I
removed the dial scale from the SP-600 meter and superimposed the two, with a
strong light behind to see how close to the needed size I was.
If you look at the original scale, you will see that the existing RF level
meter swings through an arc of only about 60 degrees.
There is plenty of leeway in the existing meter mechanism to
accommodate about 80 degrees of swing, and I printed out the final version of
my new scale to take advantage of this.
Since
the meter scale is illuminated from the rear, a transparent plastic blank,
identical in size to the original meter face was constructed.
I used clear plastic from the lid of a small plastic box, then overlaid
the original meter face and scribed the outline and screw holes.
I used a router bit at low speed on a Dremel tool to remove most of the
excess plastic, and finally used a file to bring the dimensions down to the
size of the original scale. The
paper scale was finally glued to this new transparent blank, yielding a nice
looking, and translucent dial face. You
may want to make several test alignments of the scale, the blank, and the
meter movement to be sure you have it right before you finally glue the paper
in place.
The
original meter mechanical zero was uncoupled in order to be able to set the
needle as far to the left as possible without physically contacting the meter
pole piece. Finally, the original
needle bumper strips were repositioned to allow the new wider needle swing,
and the meter was reassembled and remounted on the front panel.
All the leads to the original meter were removed and taped.
Note
that when you remove the original wires from the upper end of the S-meter zero
pot (R69), you must ground them. This
is necessary to provide the correct DC return path for the audio detector.
The new S-meter amplifier circuit was built up on a small board that was conveniently mounted on the bracket that holds the rear of the selectivity switch. The circuit for the new S-meter amplifier is shown below
.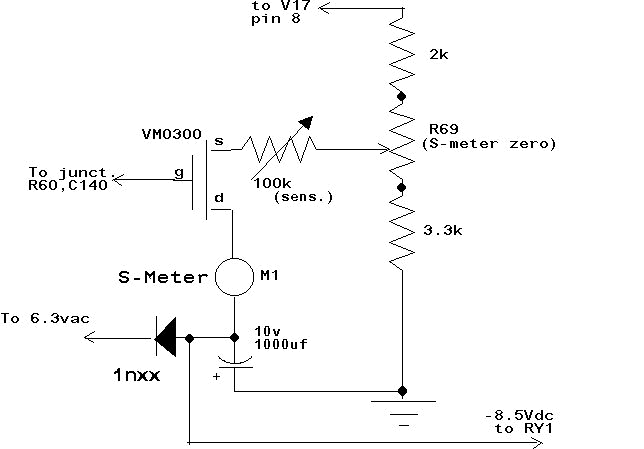
The circuit uses a VM0300 P-channel, enhancement-mode, FET. The transistor is available from Active Electronics, Inc, and no doubt other parts suppliers as well. There is nothing unique about this part, and it is likely that any similar P-channel enhancement mode FET will work as well. The original S-meter zero pot is used to bias the FET to the point where it is just turning on with no signal input to the receiver. The cathode bias of the audio output tube is used to generate the needed positive voltage supply. A negative 8.5 volt supply for the drain is obtained by half-wave rectifying the receiver filament voltage. This supply is also used to power the relay I used to switch the new product detector into the audio amplifier.
The
meter zero pot is adjusted so that the meter needle just rises off the low end
of the scale. The sensitivity pot
is adjusted so that the strongest received signals will just cause the meter
to peg on the right hand side.
III.
The Product Detector. The
product detector uses the circuit from the SX-101A receiver.
I’ve installed it in several other receivers, with very good results
in all cases. Since V12, the BFO
buffer, will not be required, it is not necessary to drill any new holes for
the product detector tube.
Begin by clearing the unneeded components from the V12 socket.
In my receiver, several parts which feed both V12 and V11 were
terminated on V12. They must be
moved over to V11 first, so that it will continue to operate properly.
The BFO injection pot is no longer needed.
To switch from AM to SSB, the audio amplifier input must be switched from the output of the AM detector to the output of the product detector. You can do this by running shielded leads to the front panel Mod/CW switch, S7, but I chose to use a Radio Shack 12vdc DPDT relay instead. The relay is mounted near the AM and product detector location, so long shielded leads are not necessary. S7 now energizes the relay, which switches the audio amplifier over to the product detector output. It also completes the circuit for a diode I placed across R60, to give a faster attack AGC characteristic on SSB (refer back to the AGC schematic for a better view of the diode location). The product detector circuit is shown below.
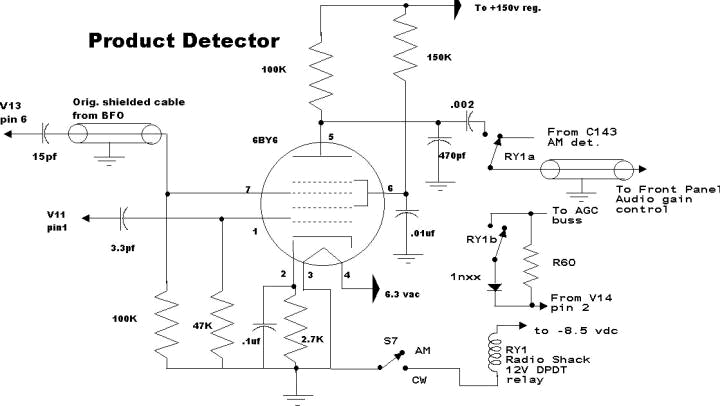
Originally,
S7 also had a second set of contacts used to switch in C137, a .22 ufd
capacitor, to slow the AGC time constant for CW/SSB reception.
I preferred the flexibility of having the AGC time constant
independently selectable from the AM/SSB mode.
Sometimes I want long AGC time constants on AM when there is rapid
fading or controlled-carrier modulation.
For this reason, I removed the original RF/AF meter switch and replaced
it with a SPST switch that connects a .1-uf disc ceramic capacitor to ground
from the AGC buss. This gives an
adequately long time constant for SSB or fast fading AM conditions.
The new switch becomes the FAST/SLOW AGC selection.
When
the new product detector is connected to the V13 BFO, it will change the
center frequency of the BFO somewhat. Be
sure to readjust the BFO center frequency, by adjusting L44, to coincide with
the center of the receiver pass band.
You will select upper or lower sideband by setting the front panel BFO frequency knob to between 1 and 1.5 khz above or below, respectively.
|


![]()
![]()
![]()
![]()
![]()
![]()